Configuring Citrix Web Interface and Load Balancing with Windows NLB


To configure Windows server 2008 R2 to load balance Citrix Web Interface 5.x is very simple procedure. The following procedure describes the basic steps involved.

Configure Citrix Web Interface

Open the Citrix Web Interface Management console

Click “XenApp Web Sites” and click “Create Site”

Modify the IIS site settings if required

Click “Set as the default page for the IIS site”

Specify the point of the authentication as “At Web Interface”

Click “Next” to finish creation of the site

Once the site is successfully created click “Next” to configure the site

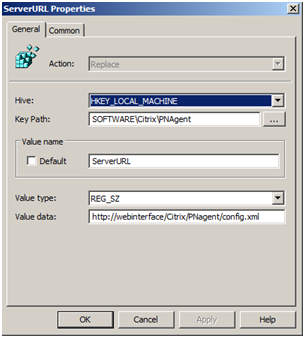
Specify the Citrix Farm name, Citrix Servers and the XML port

Continue reading “Configuring Citrix Web Interface and Load Balancing with Windows NLB”

Configuring Citrix Receiver/Online Plug-in via Group Policy


To automatically configure Citrix Receiver or Online Plug-in with the Web Server Address on client computers you can utilise Group Policy Preferences to create the necessary registry key.

  • Create a new or modify an existing GPO and browse to Computer Configuration > Preferences > Windows Settings > Registry
  • Create “New” > “Registry Item”

Action – Replace
Hive – “HKEY_LOCAL_MACHINE”
Key Path – SOFTWARE\Citrix\PNAgent (32-bit client computers) OR
Key Path – SOFTWARE\Wow6432Node\Citrix\PNAgent (64-bit client computers)
Value Name – ServerURL
Value Type – REG_SZ
Value Data – http://SERVERNAME/Citrix/PNagent/config.xml

  • Click OK to finish
  • Once the Group Policies have been refreshed on the client computers, the registry entries should have been enforced.
  • Running the Citrix Online Plug-in should reveal the setting changes have been applied.