This post covers the steps to reimage a Cisco FPR1010 device with FTD version 7.1.0, the same procedure will work on other 1000 series models. Refer to this Cisco Reimaging guide for more information.
- Connect to the console port of the Cisco FPR device and login
- At the prompt type scope system
- Run the command show detail

The System IP address is the IP address of the Management 1/1 interface of FPR 1000 device.
The software package will be download from a SFTP server installed on a laptop connected to the Management 1/1 interface.

- Connect an ethernet cable from a computer into the Management 1/1 interface of the FPR 1010 device.
- From the Command Prompt of the computer configure the device has received an IP address from the range 192.168.45.0/24.
- Determine the IP address received via DHCP, run the command ipconfig

- From the Command Prompt of the computer run ping 192.168.45.45 to confirm connectivity to the FPR 1010 Management interface.

On the local computer setup, a TFTP/SCP/SFTP or FTP server to download the software package.
- Download the FTD software package from the Cisco website, in this instance FTD 7.1.0 package is called cisco-ftd-fp1k.7.1.0-90.SPA
- Locate the file in the TFTP/SCP/SFTP/FTP repository.

- From the console of the FPR1010 device run the command scope firmware
In this example we will use SFTP protocol to download the software package.
- Run the command download image sftp://<username>:<mgmt. ip address>/<image name>

The image will download, the screen output will confirm the transferring KB increasing as the image is transferred, once complete the output should confirm completed successfully.

- Run the command show package
The output below confirms the default software image on the device 6.4.0 and the recently uploaded version 7.1.0.

- Run the command scope auto-install
- Run the command install security-pack version <package version> copy the version from the package-vers column in the previous command.
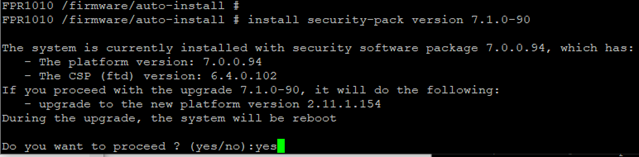
- When prompted to proceed type yes
- When prompted to initiate a configuration backup, type yes
 The system will validate the image, run show detail to confirm progress
 After a few minutes, run show detail again and confirm the Upgrade State has progressed from Validating Image to Upgrading System.
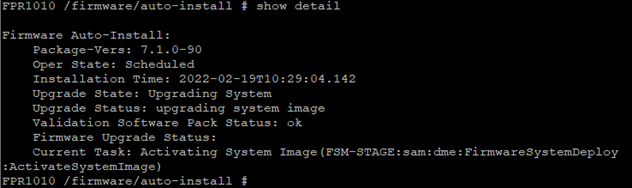 After a period, the console the upgrade will start, and the console screen will provide the output of progress.
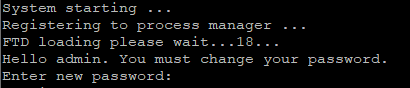
 The system will reboot and will return to the login prompt
- Login to the device with the default credentials username admin and password Admin123
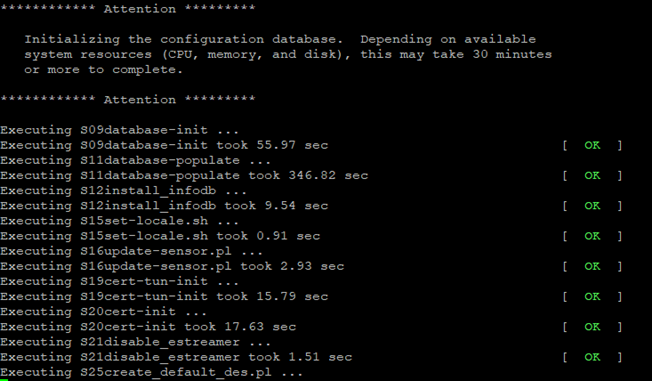
From the output below, you can determine the installation process is still underway post login to the console.

- When prompted enter a new admin password
The installation procedure will continue, at some point will confirm that the remained of the installation will take 30 minutes or more, the output from the console will confirm the progress.
- Once complete login to the device from the console
- Run the command connect ftd
- Accept the EULA
 The management interface network settings must now be configured, when prompted complete the steps to configure the IPv4/IPv6 address, netmask, gateway for the Management 1/1 interface.
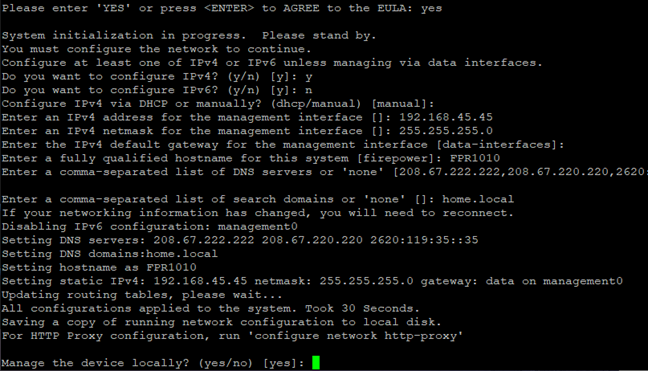
- If managing the device locally using the FDM, select yes or alternatively, if managing the FTD centrally via the FMC select no
- Optional, enable DHCP for devices connected to management interface, run the command configure network ipv4 dhcp-server-enable 192.168.45.100 192.168.45.200
The computer connected to the Management1/1 interface should now receive a DHCP address, run ipconfig /renew if required.
- From a web browser navigate to https://mgmtipaddress to setup the freshly imaged FTD, where the Device Setup wizard will guide through the setup.

Re-imaging the FPR1010 device to a newer FTD version is now complete.
