This post describes how to configure Check Point Security Management Server to authenticate users against a Windows 2008 R2 NPS RADIUS Server.
Create Active Directory Groups
Create a new Active Directory group for administrators requiring Read/Write permissions e.g “Firewall Management RW”
Add users requiring Read/Write permissions to the new group

Create a new Active Directory group for administrators requiring Read/Only permissions e.g “Firewall Management RO”
Add users requiring Read/Only permissions to the new group
RADIUS Server Configuration
Open “Network Policy Server”
Select “RADIUS Clients and Servers” and “RADIUS Clients”
Define a new RADIUS client. Enter a Friendly name, IP Address and Shared secret (this is the same shared secret you will need to use when defining the RADIUS server later in the procedure)

Click OK
Click “Policies” and then “Network Policies”
Create new Network Policy
Select appropriate Policy name e.g “Read/Write Check Point Management”, Click Next
Specify conditions, select “Windows Groups” and chose the Active Directory group “Firewall Management RW”, Click Next
Ensure “Access Granted” is select, Click Next
Tick “Unencrypted authentication (PAP, SPAP), Click Next
Click Next and Finish

Repeat the procedure and create a policy for Read/Only authentication, ensure the “Windows Groups” is the group created for Read Only access
Check Point Security Management Server Configuration
Click “Manage” and select “Servers and OPSEC Applications”
Click “New” and select “RADIUS”
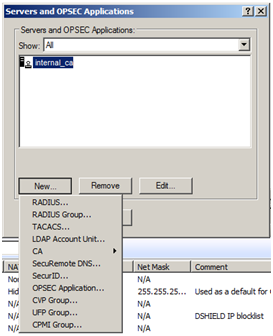
Type a suitable name e.g “RADIUS_Server”
Either create a new host or select an existing host for the server that is running RADIUS
Type in a “Shared Secret” (this is the same as previously defined on the NPS server)

Click “OK”, then “Close”
From the “Manage” menu select “Permissions Profiles…”
Select “New” then select “Permissions Profile”
Name the profile appropriately e.g “Mgmt_RW”
Select “Read/Write All” permissions

Once complete select “OK”
Repeat the process and create and additional Permissions Profile called “Mgmt_RO” and select “Read Only All” permissions
Once profiles created close the “Permissions Profile” window
From the “Manage” menu select “Users and Administrators”
Select “New” and select “Administrator…”
Enter the User Name for the administrator requiring Read/Write permissions, ensure the username matches exactly the user account name in Active Directory
Enter comment, email address, phone number and expiration date if required
Select the Read/Write permissions profile

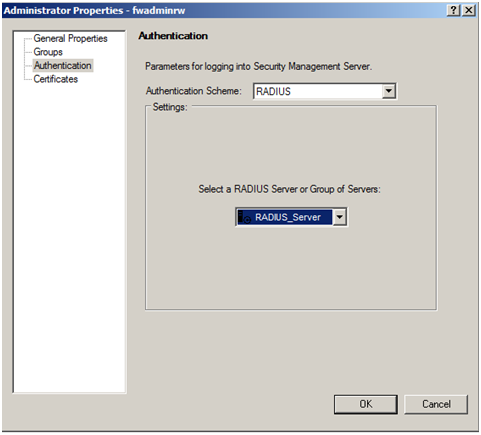
Select the “Authentication” tab on the left and change the “Authentication Scheme” to RADIUS
Select the newly created RADIUS server object
Repeat the procedure to create an administrator with Read/Only permissions
Click Close
Save the configuration
Open one of the SmartConsole applications and attempt authentication using both the RW and RO user accounts. You will notice the RO account is in “Read/Only mode and options are greyed out


Thank you, this nailed it. excellent 🙂
LikeLike
Very nice!!!!
LikeLike